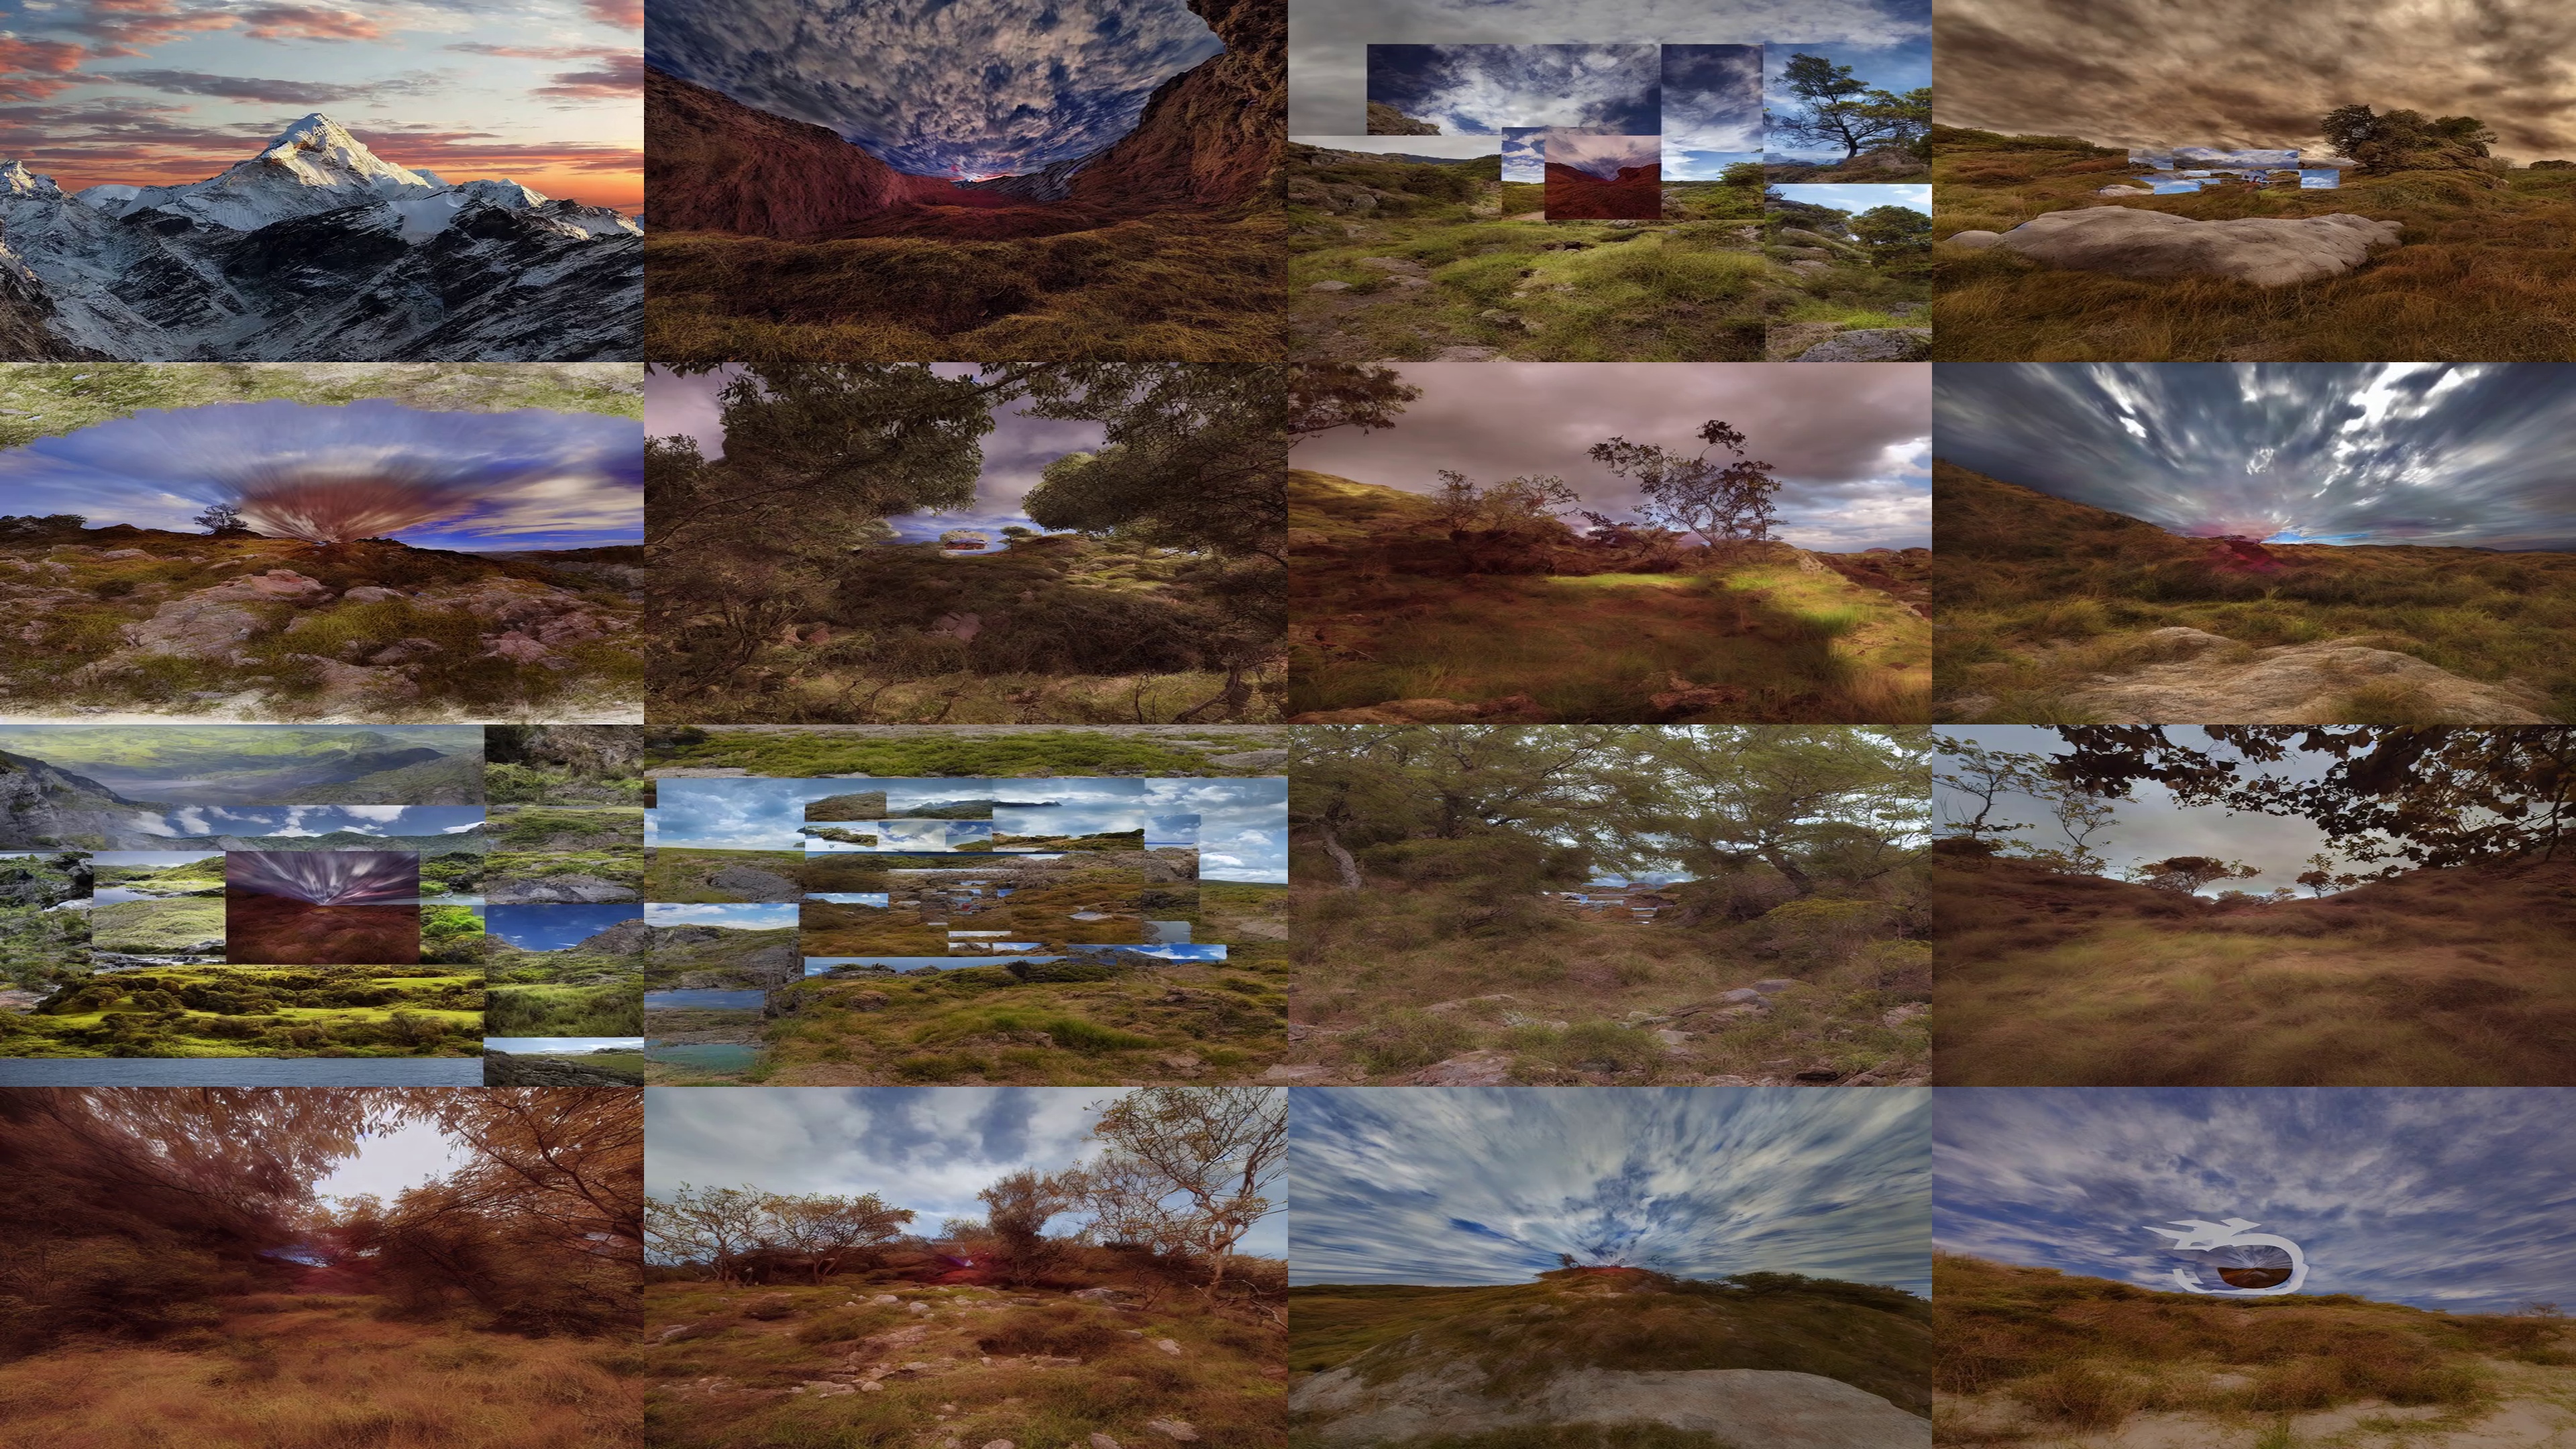
Example of the idea... we start with a picture of a 'mountain', then we 'outpaint' by 126 pixels around the edge and resize back to the original image size. We then outpaint again by another 126 pixels... and repeat. You can see this for 8 frames using the stable diffusion 1.0 model.
Zooming with Outpainting
In this little article, we'll have fun with the 'stable diffusion' (sd) library for creating an infinite zoom effect - from nothing more than a single starting image (and a description)!
If you've not heard of 'stable diffusion' - it's one of those AI libraries that allow you to replace or modify images using a trained neural network (when I say 'trained' ... I mean trained on millions of images). In this article, we're going to use this feature to 'extend' an image repeatedly.
The feature of 'extending' (or uncropping) a picture - is known as 'outpainting' - it's termed this because the model is 'painting' (or repainting) parts of image. It's a really cool tool - and very customizable - you can tell the model which areas to add and which areas to remain unchanged - for our zooming example... we want the model to paint the edges of the image (not the middle) ... we define this using an image mask.
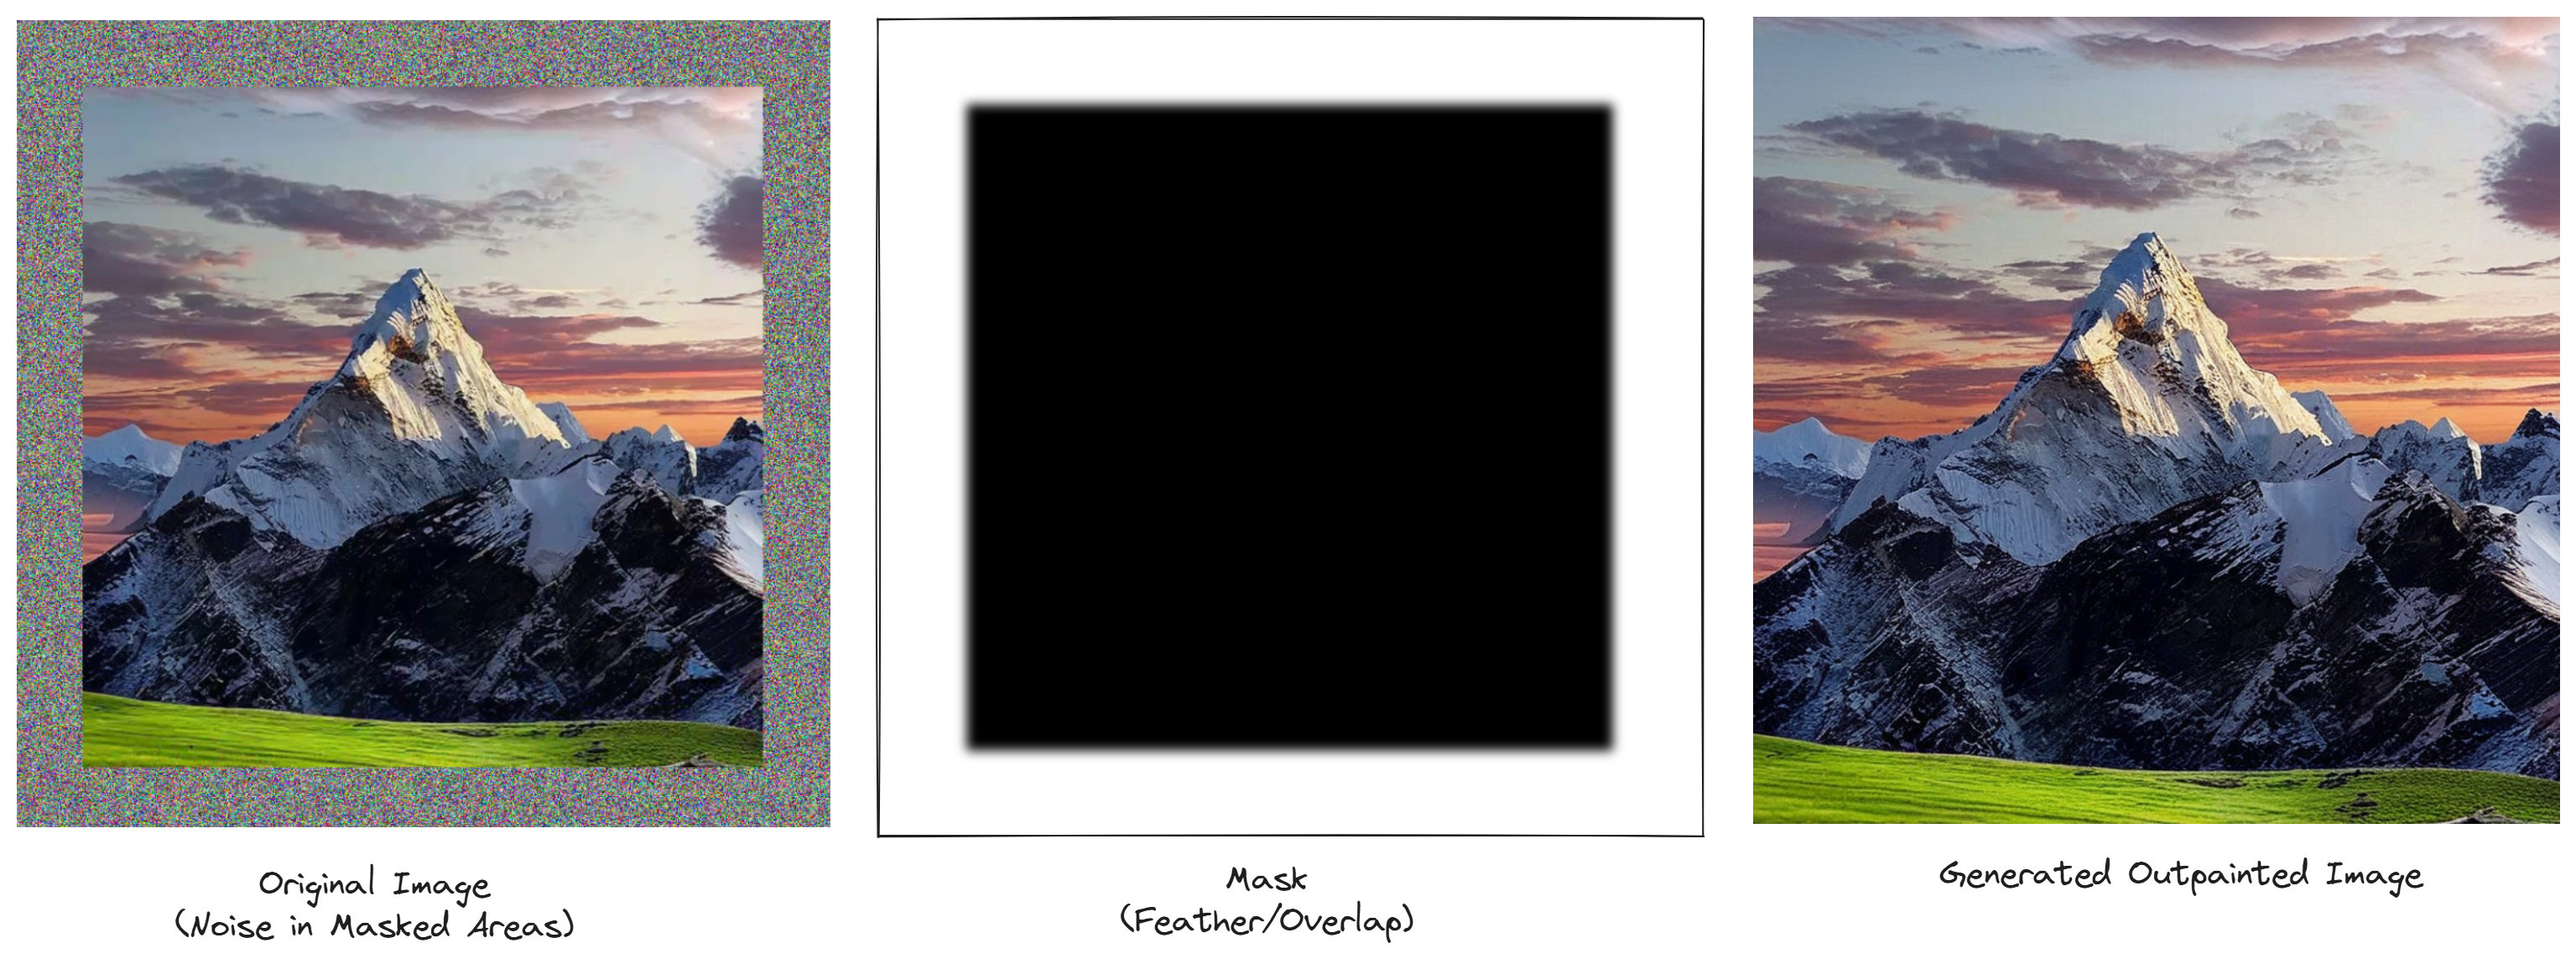
Take a look at the following example, we start with a small picture of a 'head' - we then create a mask for the outer edge (area to be painted) - this is what we want our model to fill in - then we get the final image on the right. To prevent the generated images from being crazy - we also add in a 'prompt' to help guide the model - in the example image below ... we specify an office-like scene.
Outpainting an image - taking an image and a mask - mask helps the stable diffusion model know what to replace and what to leave alone.
You might be thinking - this is old news - stable diffusion has been around for ages... what does this have to do with zooming?
Well, we can take this concept further - and keep applying the 'outpainting' effect repeatedly .... outpainting more and more and more - to create the illusion that we're moving outwards - away from the target.
Setting up (Sandpit)
This isn't a theory article - it's a hand-on ... 'how-to' approach. First thing, let's setup a sandpit so we can install any Python libraries or tools. I'd recommend using Anaconda - so you can have multiple projects and library versions and they won't interfere with one another.
For this implementation, we're going to create the outpainting images repeatedly in a loop - which will be used to create a 'video' - so you can see the zoom effect over multiple frames.
The different outpainting (or inpainting) models perform differently as you'll see - the quality and 'smoothness' of the generated images vary.
To setup a working sandpit in Anacoda with all the libraries we'll define an environment.yml below. I've done a 'cpu' version by default - and commented out at the boottom are a few extra lines .... so you can try this out even if you don't have a high spec GPU.
You can test the zooming out effect on your local computer - even if you don't have CUDA support.
Just to give you an idea of how easy it's to setup and run an outpainting algorithm - here's a minimal working code - it can be used as a test to make sure everything is setup and working. Just 'outpaints' a single image and saves it to a file.
# Taken from 101 Generative AI Project
# https://xbdev.net/ai/101generativeaiprojects/

import torch
from PIL import Image
print(torch.__version__)  # Should show '2.3.0+cu121'
print(torch.cuda.is_available())  # Should return True
print(torch.version.cuda)  # Should show '12.1'

# One-line device detection **GPU** or **CPU**
device = "cuda" if all([
    torch.cuda.is_available(),                                   # GPU exists
    f"cu{torch.version.cuda.replace('.','')}" in torch.__version__  # Version matches (e.g., cu121)
]) else "cpu"

print(f"Using device: {device}")

from diffusers import StableDiffusionInpaintPipeline

# Load image
image = Image.open("input.jpg").convert("RGB")
width, height = image.size

# Expand canvas and create mask
new_width  = width + 512
new_height = height;
canvas = Image.new("RGB", (new_width, height), (255, 255, 255))
canvas.paste(image, (0, 0))

mask = Image.new("L", (new_width, height), 0)
for x in range(width, new_width):
    for y in range(height):
        mask.putpixel((x, y), 255)

# Load pipeline
pipe = StableDiffusionInpaintPipeline.from_pretrained(
    "runwayml/stable-diffusion-inpainting",
    torch_dtype=torch.float16 if device == "cuda" else torch.float32,
    variant="fp16" if device == "cuda" else None,
    safety_checker=None,  # Optional: disable safety checker for faster inference
).to( device )

# Generate
# prompt = "a mountain landscape continuing to the right"
prompt = "trees"

result = pipe(prompt=prompt,
              image=canvas,
              mask_image=mask,
              width=new_width,  # Explicitly set output dimensions
              height=new_height,
              num_inference_steps=50,  # Try 50-100 if needed
              # strength=0.999,        # Force for replacement
              guidance_scale=9.0,      # Stronger prompt adherence
              ).images[0]
result.save("outpainted_result.png")
Next, we'll modify this so instead of creating a single image, we'll create multiple images in a loop - and construct a 'video'.
Zooming (Multiple Outpainting) - Feedback Loop
This is where we get into the zooming! We take the concept of outpainting above - but we're now going to feed the generated (outpainted) image and pass it back into the input (a feedback loop).
To prevent the images from growing and growing .... until they get too big and our system crashes - we do a bit of resizing so the image getting passed back as the new input has the same size as the original starting image.
A few things about the implementation - we specify the number of frames (how many images to generate), how 'thick' the mask should be around the edge (how much the image should grow)... we also add in a 'blur' on the edge of the mask to make the 'transition' smoother - to try and avoid any 'harsh' edges.
An overview of the algorithm - how we use outpainting to generate a set of images which can be combined to create a zoom out video.
The complete implementation is given below.
<?php
import os
from PIL import Image
import torch
import imageio # pip install imageio[ffmpeg]

# Device setup
device = "cuda" if all([
    torch.cuda.is_available(),
    f"cu{torch.version.cuda.replace('.','')}" in torch.__version__
]) else "cpu"
print(f"Using device: {device}")

# Pipelines - Pick one
if False:
    from diffusers import StableDiffusionInpaintPipeline
    pipe = StableDiffusionInpaintPipeline.from_pretrained(
        "runwayml/stable-diffusion-inpainting",
        torch_dtype=torch.float16 if device == "cuda" else torch.float32,
        variant="fp16" if device == "cuda" else None,
        safety_checker=None,
    ).to(device)

if False:
    from diffusers import StableDiffusionXLInpaintPipeline
    pipe = StableDiffusionXLInpaintPipeline.from_pretrained(
        "stabilityai/stable-diffusion-xl-inpainting-1.0",
        torch_dtype=torch.float16 if device == "cuda" else torch.float32,
        # variant="fp16" if device == "cuda" else None,
        safety_checker=None,
    ).to(device)

if True:
    from diffusers import AutoPipelineForInpainting
    pipe = AutoPipelineForInpainting.from_pretrained(
        "kandinsky-community/kandinsky-2-2-decoder-inpaint",
        torch_dtype=torch.float16 if device == "cuda" else torch.float32,
        # variant="fp16" if device == "cuda" else None,
        safety_checker=None,
    ).to(device)

# Parameters
# prompt = "outdoor landscape surrounding the scene"
prompt = "mountains, trees, grass, clouds, fields, hills, rocks, plants"
image_path = "input.jpg"
num_frames = 128
expand_size = 64

output_size = Image.open(image_path).size
frames = []

# Load initial image
base_image = Image.open(image_path).convert("RGB")

base_image = base_image.resize((512-expand_size*2, 512-expand_size*2))
output_size = base_image.size

import os

output_folder = "frames3"
os.makedirs(output_folder, exist_ok=True)

for i in range(num_frames):
    # Expand canvas
    new_width  = base_image.width + expand_size * 2
    new_height = base_image.height + expand_size * 2
    canvas = Image.new("RGB", (new_width, new_height), (255, 255, 255))
    canvas.paste(base_image, (expand_size, expand_size))

    # Mask surrounding edges
    if True:
        from PIL import ImageDraw, ImageFilter

        # Create mask with feathered edges
        mask = Image.new("L", (new_width, new_height), 0)
        draw = ImageDraw.Draw(mask)

        # Draw white rectangle around edges to define outpaint region
        draw.rectangle(
            [0, 0, new_width, expand_size], fill=255)  # Top
        draw.rectangle(
            [0, new_height - expand_size-2, new_width, new_height+4], fill=255)  # Bottom
        draw.rectangle(
            [0, 0, expand_size, new_height], fill=255)  # Left
        draw.rectangle(
            [new_width - expand_size, 0, new_width, new_height], fill=255)  # Right

        # Apply Gaussian blur to feather the transition
        mask = mask.filter(ImageFilter.GaussianBlur(radius=20))

    print('i:', i, 'new_width:', new_width, 'new_height:', new_height )
    # Outpaint
    result = pipe(
        prompt=prompt,
        negative_prompt='frame, pictures, edge, border, caption, text, white border, solid border, solid color',
        image=canvas,
        mask_image=mask,
        width=new_width,
        height=new_height,
        num_inference_steps=50,
        guidance_scale=9.0,
    ).images[0]

    # Scale to original output size
    scaled = result.resize(output_size, resample=Image.LANCZOS)

    frame_path = f"frame_{i:03}.png"
    frame_path = os.path.join(output_folder, f"frame_{i:03}.png")

    result.save(frame_path)
    frames.append(frame_path)

    # Use outpainted image as next base
    base_image = scaled

# Save frames as video
video_output = "zoom_out3.mp4"
with imageio.get_writer(video_output, fps=4) as writer:
    for frame_file in frames:
        writer.append_data(imageio.imread(frame_file))

print(f"Zoom-out animation saved to {video_output}")
Stable Diffusion 1.0
We start with the simple SD 1.0 (i.e.,
"runwayml/stable-diffusion-inpainting"
- it's fast and a good starting point.) For our zooming test, we'll use the following criteria:
• SD 1.0
• 128 frames (4 frames per second video)
• 128 mask - border size
• Input image size 512x512
• Generated image size 512x512
• Prompt: "outdoor landscape surrounding the scene"
• No negative prompt
This is the result from the first run:
Preview of the generated video (few of the frames) for the SD.1.0 model (v1).
On a second run, we get something else:
Preview of the generated video (few of the frames) for the SD.1.0 model (v2).
kandinsky-2-2 Model
The kandinsky-2-2 is a good test model and produces very different results.
Preview of the generated video (few of the frames) for the kandinsky model.
SDXL Model
The SDXL model allows you to create larger better quality images - however, I found it a bit more temperamental compared to the previous 2 other models.
Preview of the generated video (few of the frames) for the SDXL model.
Stable Diffusion XL Outpainting + Noise
The outpainting algorithm works fine with a mask and the original image (with the masked areas set to 'black' or 'white') ... however, for the SDXL model, it's a bit more sensitive - and needs a little kick to help it converge on a pattern.
We need to insert 'noise' into the masked areas of the image that are going to be painted - otherwise you'll find that the mask will converge to solid colors (e.g., white or solid color edge) - instead of outpainting a new image all the way to the edge of the image (or mask).
Insert Noise to help the SDXL outpainting algorithm.
Adding noise isn't too difficult - you can do it with an extra one line - however, without it - you might find the SDXL behaving a bit strange.
Sometimes the outpainted image didn't seem right - it kept adding 'picture' frames and white bars - or the image didn't transition smoothly - seemed fragmented or scattered - this was because the image had a small 'single' white line of pixels at the bottom ... and the make was just going up to the edge of the image (with a bit of blur). The 'blur' reduced the effect - but every now and then it produced a poor result! Eventually this was tracked down to the test image (it wasn't going right up to the edge on all the sides).
Two ways of fixing this - edit and resize the image - or have the 'mask' overlap the image borders... like 5% the image size. So even if the image is a bit rough or abrupt around the edges it will still produce a smooth transition.
This is only scratching the surface - and if you have a powerful GPU - you can really take this to new heights - and create complex videos with multple prompts - instead of just the 'outdoors' you could be traveling through a city. Some examples you can try:
• Try zooming out from a 'planet' in to the galaxy
• Try other models - I've only used 3 popular models that are free and easy to access on HuggingFace without any key or restrictions - but there are lot of other models you can try out to get other effects/results
• Mix multiple prompts so as you zoom out the prompt changes
• Try different resolutions
• Try adding in a 'blur' effect to the edge of the transition (so it looks like you're going very fast)
• Create a 'Quicksilver' type effect - put a 'dog' or another other animated picture of a face in the middle of the screen - so you see the world flashing past.
I'm not sure why, but the zooming out effect reminds me of the Quicksilver scene from X-Men - a classic moment is when he grabs the dog and you see the world rush past in the background while he's carrying the dog.
Other Related Texts You Might Find Interesting
Series of books on and around Data & AI - giving insights to untold riches that push mankind into a new digital era of 'intelligence'.
Visitor:
Copyright (c) 2002-2026 xbdev.net - All rights reserved.
Designated articles, tutorials and software are the property of their respective owners.