Texturing - Theory, Practice and Rules-of-Thumb (Secrets)
Some juicy tips, tricks and rules of thumb for texturing that I've learned over the years from here and there.
Texturing is covered in nearly every graphics book - and is taught in lots of courses - but they rarely give you the gems that you need to take your texturing to the next level.
You'll, hopefully, find the following tips interesting and will save you hours of pain and frustration over the years that I had to go through to accumulate them.
Remember these are tips and tricks - not laws and rules! Everything has its own ryme and reason (lots of special cases and situations).
How Big Should Your Texture Be? This question seems to plague developers and artists constantly. This confusions usually leaves them creating huge textures that so big they impact performance (long load times and rendering quality). More is not necessarily better when it comes to textures. On the flip side, small textures are just as bad!
So what's the solution? A general rule of thumb for texture sizes is the equation:
Texture map size equals the screen pixel size divided by the visible map percentage of the map all multiplied by 1.5. Still confused?
Example: If a quater of your texture will cover 400x400 pixels of screen space, your full map needs to be six times that (4 x 1.5)=2400 pixels.
Study The Real-World (Look Around You)
If you do a lot of texture work - you should never be bored! There are textures all around you. The world is full of textures.
Anytime you're not looking at the computer screen - you should be looking around and studying surfaces - the side of a bus, a window, the sky, the floor. Take time to explore the world around you and see the detail! What catches your attention - what is important and what isn't?
The world is full of infinit detail which you're trying to cram into a texture.
In fact, if you're working on a project that requires a specific type of texture - go and find real-world images of it - go and actually see it! It can be anything from the head of a bald man to the scratched on a car tyre.
Collect samples to help you along your texture journey - build a library. After a while you'll develop an eye for detail. What is important and what isn't - what is common or what can be changed.
The process of searching for detail causes your eyes to focus on things you never saw before you begain. This practice will make more of a difference than almost anything else you can undertake to improve your skills. It might seem obvious - but that's why most people miss it.
Training your fingers is easy - it's your eyes that are far more challenging.
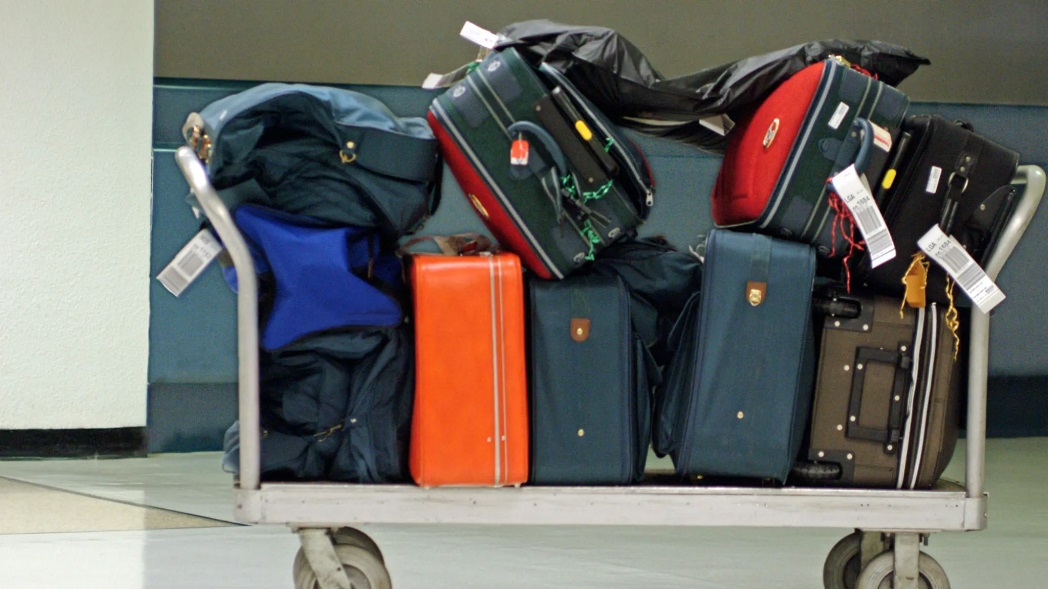
For example, suitcases - if you want to see the diversity of textures - next time you're at the airpot just look around at peoples bags - they come in all sorts of shapes, sizes, materials then there is stickers and dents, ... you should think about what is common, what is different - how can one person spot their suitcase from another on the convor belt. Lots to think about if you were to develop textures for suitcases.
Unconscious Stuff
Most artists and developers use basic texture - removing useless elements or not taking the time to add them. Think about things like stickers, stains and random details that are only semi-related to the scene. These extra details exist in the real-world - no including them on your texture makes people feel uneasy (that something isn't right).
Usually very easy to add these extra overlapping details using multi-texturing (e.g., scratches and dirt can be applied with a few extra lines in the shader).
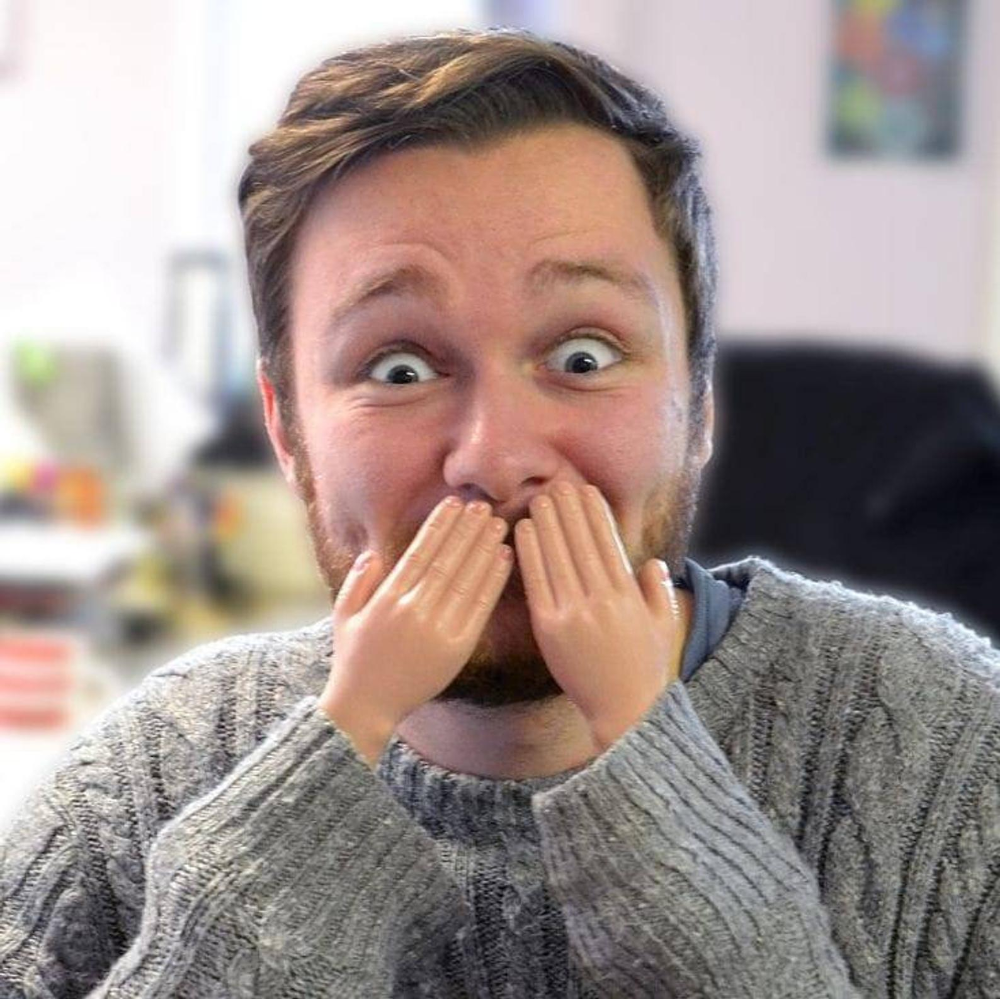
Size matters - the real size and the 'perceived size'. While the details might be correct, the context and surroundings must correlate - or you'll end up with weird and uncanny! (Look at the picture of little hands - why do they look wrong?)
Scale Matters
When you see something with lots of small and intricate detail, you image scale! Adding lots of fine elements, you can actually increase the perceived size of an object.
Don't Go Procedural Crazy
Procedural textures are great! But they're also very very dangerous. 90% of the time, they look procedural and make your results look amateurish (cheap and bad).
If you're going to use procedural shaders - try to mix them with photographic elements.
Try and mix and introduce diversity when using procedural textures - avoid the cookie cutter - some colors, patterns, distribution - it looks bad!
Work Smarter Not Harder
Try to avoid painting lots of detail by hand. Face it, you can only consciously see a fraction of the world you're trying to pain.
You can build the base components by hand; but always look for procedural ways to add* a finish that has more detail than you can see.
Mirror Mirror
When you start out designing and building your textures - have a plan! It will help with consistency and quality. You know what you want. You're trying to create textures that form a larger canvas - taht work together - colors, details, story, theme, ...
Look At Neighbours
Think about the surroundings - how they affect the surface and interact - do they blend or abruptly change - would they be seen next to each other? For example, stains on the floor or water on the window.
Make your textures stand out - but in a good way! Does the texture fit in with its neighbours?
Look at Environment
Is it inside or outside? Is the surface in direct sunlight or in the shade? Would passers by hit it? All of these questions will create answers that help with your texture design!
Few Things Are 100%
No attribute or property is 100% pure! Nothing is the real-world is perfect!
Paint Lighting
Lighting a complex scene can be difficult - but you can't ignore light and how it interacts with the texture. This includes shadows (soft ones and hard ones).
Textures are NOT Models
Don't model with texture maps - you can't replace geometry with textures. Think of textures as the dessert not the main course!
Correct Texture for the Model
Does the texture map the model? This includes the orientation and multiple objects connected together.
Photographs
Don't paint a texture if you don't have to! Photographs are real! They do not recreate reality - they're pictures of reality. The level of detail required is often beyond what you can see consiously - so a real-world photo fixes this - it sees things you don't.
Today, with 4k and 8k cameras! You can take photos that capture insane detail!
Depth of Field
Helps hide things that you don't want people to look at - textures that are limited (in resolution or details) - can be put to the back - blurred.
Too Much Detail (More is Not Better)
Adding more and more details - super crazy detail - is not the solution - you have to find the right balance. If you have too much detail, you'll only end up having to remove it later on!
Lenses
Different lenses show textures in different ways - flattened, distorted, ... these can be a godsend (or a devil - don't use it because have it - use it because you need it).
Easy on the bumps and normals
Just because you can use bump maps and normal maps - doesn't mean you should go crazh and turn things up to 11. Overly emphasised bumps cause your result to lose scale, soften the texture and cause aliasing problems. If you keep bumps subtle, your objects will thank you - by looking larger, sharper and more realistic.
Seamless does not mean 'repeatable'
Just because you got rid of any seams between textures doesn't mean that you can repeat the texture. Large visual elements will give away your trick. Something that repeats often needs to be either very bland or mechanical.
Work at High-Res
You don't work on textures at the same resolution that you'll need them. Build textures 50% to 100% larger than what you think you'll need. You can always scale them down, but scaling up never goes well.
Use distortion to straighten images
If you get some distortion in your images, try turning on a grid and using a distortion algorithm to straighten it out. You need some extra resolution to handle stretching, but it's fairly effective.
Cut the Model
If the texture isn't mapping to the model easily (getting overly complex) without stretching and cutting it - try adding `slices' to the model instead (maps better to the surface)
Trying to map a texture with a hard edge across a single triangle can make the edge look 'blurred' or 'fuzzy'. Instead - just add a cut into the geometry!!
Mixing Old with New
Overlaying pictures of real-world textures of concrete, dirt, bricks ... helps enhance textures by subtly adding aspects of realism to the texture (secondary details)
Lighting Effect Layers
Applying lighting effects to 'layers' - which can be tuned and blended using artistic control (not just hard coding and mixing). It saves time if you want to turn of effects or tweak them dynamically for a specific situation.
Pinching
You might not konw this - but you can use 'polar coordinates' for textures. The first thing people say when you tell them that is, why would they want to use polar coordinates. They take the 'pinch' out of spherical objects (spherical maps).
The process isn't that painful. Convert the rectangular coordinates to polar and you're good to go!
Removing Seams
How to make seamless textures? The easiest way is to use 'offsets' - so you can 'shift' the image by a small amount to 'fix' any gap.
Clouds
There is a debate about using clouds - some say could add a natural outside atmosphere - while others says it adds grime (breaks everythign up and gives a lifeless effect). It really does depend on the texture and context - also the quality of your clouds (if they're static textures or procedural and animated).
Animating Textures
Textures do not need to be static! They can be moved to create all sorts of juicy things - like flames or smoke. They can even be combined with geometric contexts - to displace geometry and more.
Think in Layers
Layers! LAYERS! LLLAAYYYEERRSSS!! You don't have to mash everything together in one place. Keeping textures and their input and output in layers makes your life and result better (don't just mash them together in one place).
Keeping them seperate, you can make quick changes to things such as water damage, brick patterns and more. The changes are quick and easiy rather than breaking everything in one place - they can be swapped out and tweaked seperately (also be tested individually).
Don't use everything!
If you notice you're using the same cool effect (or tricks) all at the same time and constantly! Stop and consider whether it's the best solution, or you're just using it because you know it!
Every challenge is unique so your approach should be too. It doesn't mean you shouldn't use your tricks, you just don't need to use them all the time and 'automatically'.
Environmental Maps
A good environmental map is often better than a ray-traced* solution. You want it to look real, but that doesn't mean you want perfect reproduction quality - sometimes cheating is a good thing (gives you what you want).
Match Spec and Diffuse
If the diffuse is doing something, whatever is causing it would probably have some effect on the specular attributes. Make sure changes cover both areas. The integrity will make the object more believable.
Visitor:
Copyright (c) 2002-2026 xbdev.net - All rights reserved.
Designated articles, tutorials and software are the property of their respective owners.