www.xbdev.net
xbdev - software development
Tuesday May 14, 2024
home | contact | Support | Slice of Java. Its simple and its powerful...


Slice of Java.

Its simple and its powerful...


The 3rd Dimension! x, y and 'Z'

by Ben Kenwright


One such Projection in 3D (Perspective Projection) is when we make things seem smaller as they get further away.  We perceive that a object with a larger z, is smaller than a similar object with a smaller z (where z is the distance from us)...as you do in real life.   Now in 3D, we have x, y and z values.  But our screen is 2D..it only has x and y....so our job is to do the magic maths which will convert our 3D values to 2D ones so we can render them on the screen.


Just to note, there are two main ways two do this -  'Orthographic Projection' and 'Perspective Projection'.  Now people who are new to 3D and maths will not believe how easy Orthographic Projection is....what we do is just throw away the z value and use the x and y....simple eh?  This sort of projection is used in technical drawings for example.

Perspective projection on the other hand is a little more tricky and is what where interested in.  This is the one that makes things seem smaller as they get further away, and the one we'll be going over and of course using in our 3D examples :).


At this point, you might want to get comfy in your chair and try not to fall asleep!  Its interesting stuff this 3D projection. 


Lets start simple...we have our eye...which is us... and we are looking forward.  I like to use the left handed coord system, which means that the positive Z is into the screen.  Now using this method, all our x, y and z values have to be in front of us.  We can't go having any objects behind us, as we can't see things that are behind us, else we'll have eyes in the back of our heads.  And so as you'll see, later on, we usually just clip these objects away.  But if you do try and render them, you'll some crazy distorted things!  As you'll see in a minute when we get to the maths of how and things.


The very simple truth behind going from 3D to 2D, is dividing our 3D x and y by its z value.....simple huh?  Well that's the basic's of it...of course there's a bit of scaling and things...but beleive me its just dividing by z at the heart of it.  Of course I'll have to give you a bit of maths proof this, so you can say "hah, thats why" :)


Using the relationship between similar triangles we get this:


Equation:


Now take a gooood looksy at that equations, as its how it works.  We'll re-arrange it now for Y and we will have our conversion formula on projecting our 3D points to a flat surface.

We start with

Y/f = y/(f+z)

Re-arrange for Y

Y = f * y / (f+z)


ta-da...there we go.  A good thing to note, is if you look at our diagram above, I've made the projected plane with z=0, and put our eye behind it.  If we instead put our eye at z=0 and our projected plane in front of it, our equation changed to this:


Y = f*y/z


Which is what we expect, as our z value is relative to 0.


Y/f = y/z

Giving Y = f*y/z


:)


Nearly all of the time we'll have our camera or should I say eye at z=0.  As we will move our will around so that it meets this....as in games and demo's where the camera seems to move and your following the character in the game...or moving through a 3D world....what your infact seeing is the world move and the camera stay still :)  ....hehe...yup that sounds crazy why you add it up in your mind.  But you'll see how this works when we get to camera's and moving 3d data around.


There are a few minor details I forgot to mention...which we'll go over now.  First thing first, we need to discuss scale!  As how big is our projected plane, and we have to scale it correctly to our screen.  Then there' is the x,y and z coordinates, where in fact x and y of 0,0 is the middle of the screen...but when you come to drawing on a real screen in 2D pixels...the top left is 0,0...so we have to add a constant to move them to the correct place on screen.


First, lets assume we want to render to a projected screen with a focal point of 1....then its easy for us to scale it to the screen.  We'll keep it simple!  Simple is good :)  We'll see what this gives us and fix it as we need to.


Y = f * y / z

But f = 1, so we end up with

Y = y/z


Our eye is at 0, and our point is being projected onto a plane at a distance of 1 away from us.  If we use 'sohcahtoa'...well I remember it that way..hehe...what I mean, is we use trigonometry to work out the minimum and maximum values of our projected values.


If we assume our Viewing Angle is 90 degrees, it helps with the numbers.  So we know tan(Angle/2) = Y/f.   Where the tan of 45 is 1....dang that makes the number easier.  So if we make our focal distance 1, and we assume a viewing distance of 90, we get a x and y with a size of between -1 to 1.  Its between -1 and 1 because we only took half of the triangle into account as you can see in the diagram above.


Of course you can plug other values into your equations, possibly use a viewing angle of 60 degrees....and just re-arrange the equation to:  +/- Y = f*tan(Angle/2).

So for example if you chose 60 as your viewing angle, you would have -1.73 to +1.73.


Next is moving our image - from -1 to 1...to 0 to 2...as 0,0 for our screen is the top left.  So for our 90 degree model, we simply add 1 so its between 0 to 2.

Then so it makes scaling easy....and easy is good....we'll multiply our value by 0.5, so our projected coord is between 0 and 1.


The final thing, is to scale it to the size of the screen - which is a matter of multiplying it by the screen's size...either the width for the x value or the height for the y value.


NOTE:
A quick note on the y axis - try to remember that 0,0 is in the top left of your screen when you rasterize.  Also, that the positive y value for your screen is downwards.  Where in the 3D coordinates....the middle is the centre of your screen in 3D...and the positive y is up...unless your working on a new 3D coord system that's different from the standard :)


Applet Code Demo Code: (Download Source)

/*********************************************************************************************/

/*                                                                                           */

/*  Java 3D Engine Basics Tutorials - Tut Solid Triangle using Perspective                   */

/*  Auth: bkenwright@xbdev.net                                                               */

/*  URL:  www.xbdev.net                                                                      */

/*                                                                                           */

/*  Perspective - x, y and of course Z                                                       */

/*                                                                                           */

/*********************************************************************************************/


import java.awt.image.*;

import java.awt.*;

import java.applet.*;


public class perspec extends Applet

{

  public void paint(Graphics g)

  {   float z = 1.0f;

                  ScreenPerspective( g,

                         -1.0f,  -1.0f, z,   // bottom left point

                          1.0f,  -1.0f, z,   // bottom right point

                          0.0f,   1.0f, z,   // top middle point

                         Color.blue);                           

  }// End of paint(..)


  public void ScreenPerspective( Graphics g,

                                     float x0, float y0, float z0,

                                     float x1, float y1, float z1,

                                     float x2, float y2, float z2,

                                     Color c )

  {

                  // Get the screen size of our applet

                  Dimension appletSize = this.getSize();

                  int width  = appletSize.width;

                  int height = appletSize.height;


                  // Check our triangle isn't behind us

                  if( (z0<1) && (z1<1) && (z2<1) )

                     return;


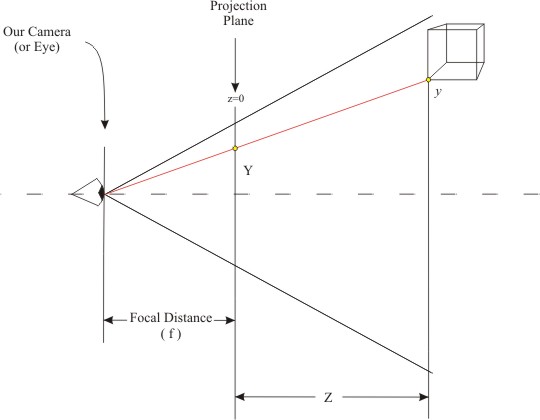
                  // Something worth noting - we have a pole at z=0...as when we

                  // create a perspective ..which is x_per = d*x/z for example, if

                  // z is 0 or very close to zero, we'll get an infinit number...so

                  // if we have a z value less than 1 we'll just round z to 1 and it

                  // will get clipped later down the line.


                  // We've not done any checking for values which cross our z=0 pole

                  // plane...and are in front and behind the camera - we would need

                  // to do a clipping stage before this one to prevent this.


                  // Add some clipping code so Z is clipped to the near view plane

                  // ++ //


                  // From x,y,z to x,y for the screen.

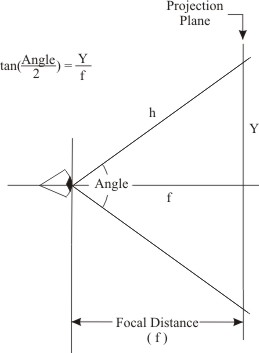
                  // -1-Perspective Conversion


                  // Focul point of 1 (Normalised view plane 90 degrees)

                  float d = 1;

                  float Perspective_x0 = -d*x0 / z0;

                  float Perspective_x1 = -d*x1 / z1;

                  float Perspective_x2 = -d*x2 / z2;


                  // its between -1 to 1...so we need to scale it to 0 to 1...and scale to

                  // the size of the screen.

                  Perspective_x0 += 1;

                  Perspective_x1 += 1;

                  Perspective_x2 += 1;

                  // So now its between 0 and 2 and not -1 to 1;

                  Perspective_x0 *= 0.5;

                  Perspective_x1 *= 0.5;

                  Perspective_x2 *= 0.5;

                  // -2- Now we scale it to the size of the screen

                  float Screen_x0 = (width-1)*Perspective_x0;

                  float Screen_x1 = (width-1)*Perspective_x1;

                  float Screen_x2 = (width-1)*Perspective_x2;


                  // Add some clipping to make sure its on the screen here

                  // ++ //


                  // Now we do the same for the y value to convert it

                  // to screen coordinates … its exactly the same as for the x above,

                  // but I've combined all the stages into a single line for each

                  // one


                  // Note y1 is the top of square, and y2 is the bottom of our square


                  float Screen_y0 = ((-d*y0 / z0)+1)*0.5f *(height-1);

                  float Screen_y1 = ((-d*y1 / z1)+1)*0.5f *(height-1);

                  float Screen_y2 = ((-d*y2 / z2)+1)*0.5f *(height-1);


                  System.out.println( "x0: " + Screen_x0 + "  y0: " + Screen_y0 );

                  System.out.println( "x1: " + Screen_x1 + "  y1: " + Screen_y1 );

                  System.out.println( "x2: " + Screen_x2 + "  y2: " + Screen_y2 );

                  System.out.println("");


                  // Render our data

                  SolidTriangleAPI( g,

                                    Screen_x0, Screen_y0,

                                    Screen_x1, Screen_y1,

                                    Screen_x2, Screen_y2,

                                    c );           


  }// End ScreenPerspective(...)


  void SolidTriangleAPI( Graphics g,

                             float x0, float y0,

                             float x1, float y1,

                             float x2, float y2,

                             Color c )

      {

             Polygon     triangle = new Polygon();

             triangle.addPoint((int)x0, (int)y0);

             triangle.addPoint((int)x1, (int)y1);

             triangle.addPoint((int)x2, (int)y2);

             triangle.addPoint((int)x0, (int)y0);


             g.setColor( c );

             // Wireframe Mode

             // g.drawPolygon(triangle);

             // Solid Mode

             g.fillPolygon(triangle);

      }// End of drawTriangleFlatAPI(..)


}// End of our Applet


Even though the applet isn't much to look at, it shows a nice demo of how you would use a simple conversion from 3D to 2D before rendering.  Try fiddling around with the z value in the paint function - changing it from 1 to 5 for example and also seeing what happens when you create negative values ;)....of course you won't be allowed to in the real world...but it will render the triangle...even though its a negative mirror of what it looks like behind...usually you would clip triangles like this.


Advert (Support Website)

 
 Visitor:
Copyright (c) 2002-2024 xbdev.net - All rights reserved.
Designated articles, tutorials and software are the property of their respective owners.